Thursday, November 28, 2013

Park Restaurant

To celebrate our 11 year dating anniversary (really, just another excuse to eat out), the hubster and I went to Restaurant Park which is located (not a Park street) on Victoria street in Westmount.

It’s only been opened since 2012 but I’ve heard fantastic reviews and, for Montrealers, executive chef Antonio Park is also known for his previous gig at Kaizen Sushi Bar & Grill. The menu is written on a large blackboard and changes often to accommodate seasonal ingredients.

Apparently Chef Park is one of the few chefs in Canada that has an importation permit for private fish, which in turn assures a fresh selection.
When we walk in, I immediately felt at ease. Given the buzz around this place, I half expected some level of pretentiousness. In fact it was the complete opposite. Everyone was incredibly friendly. Relaxed but efficient, they made you feel welcomed and not afraid to ask questions. Our waitress knew the menu very well, which is great when the food is somewhat unfamiliar.


Since this was our first time at Park, we opted for the tasting menu. This is a 5 course meal for 75$ each. The first course was a soup. Sweet beef broth with scallions and a poached egg.
You could tell the broth was made from scratch. It was like drinking roast beef. Loved the poached egg and the added flavour it gave. 
Next up was a "salad course". Burrata cheese with cherry tomatoes sitting atop a bed of cooked julienne fennel and yellow beet.
Those beautiful splashes of colour are different varieties of beet, puréed. Very fresh and tasty. It was a real shame to destroy this piece of art.
Next up was my favorite part of the meal; the nigiri. I'm not a huge fan of nigiri normally. Too much dense rice and bland sashimi. But these nigiri's were the complete opposite of this. The rice was moist and flavourful, the raw fish incredibly fresh. These almost looked like the ones in the documentary Jiro Dreams of Sushi.
The toppings included yellowfin tuna, salmon, red snapper, mackerel. All these had garnishes, some of which were new to my palate such as the shishito pepper. It's a Japanese pepper which is very tasty and mild but once in a blue moon you can get a hot one. It wasn't the case this time. The one with the brown liquid was a salmon nigiri with a maple sauce. Delicious!
Served in parallel was another dish which was not on the tasting menu but was requested by us, sea urchin!
I have wanted to taste sea urchin for the longest time but never had the opportunity. Why? Simply because I love to try new things and I've heard such great/awful things about sea urchin. So is it the foie gras of the ocean like some say or does it taste like a wet sponge? I'm honestly not sure. It wasn't bad, but it wasn't great either. The taste is difficult to describe and the texture slightly creamy. I'd be willing to try it again, but not at the ridiculous price of 45$ that we paid. There is one thing I did love about this dish, aside from the beautiful presentation. It was served with a dwarf peach pickled/marinated with some truffle oil which I absolutely adored. Too bad it was so small.
Next was the ''main course''.
Scallops served on Jerusalem artichoke (my favorite root vegetable) in a dashi kombu jus. That brown streak is black garlic purée. More of a decoration than an edible part of the meal since it was very difficult to scrap it off the plate. This was also excellent and I was glad not to have more than two scallops since I was pretty full by now.
At this point, I noticed something unusual when my husband when to use the facilities. The waiter who constantly kept refilling our water glasses casually stepped up to our table and neatly folded Anthony's discarded serviette.
Notice how the napkin is placed strategically at the corner of the table after being folded. I have never seen this done in any other restaurant. It shocked me so much that I was compelled to discreetly take a picture once the waiter stepped away.
The big finale was my second favorite dish of the evening: dessert!
An orange blossom cupcake topped with dolce de leche and a popped quinoa cracker. Served with dark caramel, lychee gelly, pomegranate seeds and green tea ice cream. Yes it was as tasty as it was pretty and the orange blossom cake was to die for!

So overall, a memorable experience at Park Restaurant from beginning to end. The only drawback is that it costs an arm and a leg. It is without a doubt the most expensive meal we've ever paid for (cough sea urchin). Would I got back, yes. However, I would stick to the à la carte menu and opt for a cocktail instead of a bottle of wine. That way, I know I'll enjoy a good meal without going breaking the bank.
If you have a special occasion coming up, I highly recommend trying out Park Restaurant.

Sunday, November 17, 2013

Julia Child's Awesome Brownies

I was sure I had already added this recipe on this blog. I was shocked to discover I hadn't. These are the best chocolate brownies you can make. Period. They're gooey, fudgey, super moist, and just simply delicious. If you like your brownies with a fudge like consistency, the secret here is not to over bake them.

This is a Julia Child recipe. The only thing I changed was to add some chopped walnuts, which is entirely optional.

Ingredients

  • 1 1/4 cups sifted all-purpose flour
  • 1 tsp salt
  • 8 ounces unsalted butter
  • 4 ounces unsweetened chocolate, chopped
  • 2 ounces bittersweet or dark chocolate, chopped 
  • 2 cups sugar
  • 1 tsp vanilla extract
  • 4 large eggs, room temperature
  • 1/2 cup walnuts,chopped
Preheat your oven to 350°F.
Sift the flour and salt together.
Melt the butter and the chocolate in a small saucepan over very low heat or use a bain-marie. Stir frequently and make sure that the mixture doesn't stick or burn.
You should get a silky chocolate mixture once melted. At this point you will be tempted to drink the melted chocolate straight from the pot. Don't.
Add 1 cup of the sugar to the saucepan and stir until dissolved. Remove from heat and stir in vanilla extract. Pour into a large bowl.
While that cools off, put remaining 1 cup of sugar and the eggs in a bowl and whisk until just combined.
Before
After
Bit by bit, pour half of the egg mixture into the chocolate, stirring constantly to prevent the eggs from coagulating.
Whisk up the remaining egg mixture until thick and pale, roughly 3 minutes.
After whisking 3 minutes in stand mixer.
Using a spatula, gently fold in the whipped eggs into the chocolate mixture. Folding instead of stirring helps to keep the air into the mixture. Once just incorporated, fold in the flour and the walnuts if using.
Folding in flour.
Folding in walnuts.
Pour into an ungreased 9inch pan.
Before baking.
Bake for 22 to 26 minutes, until the outside turns dark and dry but the inside is still slightly wobbly when you shake the pan. Don't be scared to under bake! Let cool and cut into delicious squares of yummy chocolate heaven.
After baking.

Sunday, November 10, 2013

Scotch Eggs

Scotch eggs is not a dish for people who have issues with their cholesterol. It's a hard boiled egg, surrounded by sausage meat, breaded and deep fried. It's pretty intense and heavy. It's also, in my opinion, not a very fun dish to make.  It's messy and you have to be careful with your timing. But it's also really tasty, which is why it's on this blog.

The recipe is from Robert Irvine, in the October 2013 issue of the Food Network magazine. The recipe doesn't specify what kind of pork sausage you should use. However, having tried it with Italian sausage, I felt that it may have overpowered the taste of the eggs, so a milder, more neutral flavoured sausage would work better.

Makes 6 Scotch Eggs
Ingredients

  • 8 large eggs
  • 2 tbsp white vinegar
  • 450g of pork or veal sausage
  • 4 tbsp of chopped fresh herbs (parsley, chive, oregano, tarragon)
  • 4 cups vegetable oil for deep frying
  • salt and pepper
  • 1/4 cup milk
  • 1 cup panko breadcrumbs
  • 1/2 cup mayonnaise
  • 3 tbsp mustard
  • juice of 1 lemon

Step 1: Cooking the eggs

Place 6 of the eggs in a saucepan. Cover with cold water, about up to an inch over the eggs. Add the vinegar. Bring to a boil, lower the heat to minimum and leave uncovered for 8 minutes.
Once done, drain the water and cool off the eggs by running cold water over them for a couple of minutes.
Gently peel the the eggs and set aside.

Step 2: Preparing the meat

In a stand mixer, mix the sausage meat (removed of it's casing) with the herbs and one of the remaining eggs. 
Before

Mix together until well blended.
After
Slightly moisten you hands and gently mold the sausage mixture over the peeled eggs.

Step 3: Preparing the breading

At this point, you can start heating up your oil in saucepan on medium heat (at around 325°F). Also preheat your oven at 350°F.
Put the flour mixed with the salt and pepper in a shallow dish. Mix the last egg with the milk in a bowl. Place the panko in a third dish.
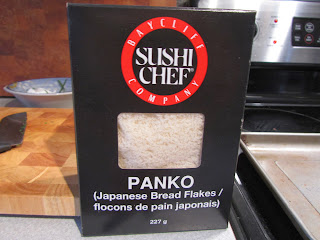
If you're unfamiliar with panko, you're missing out. They're Japanese style breadcrumbs. Unlike traditional breadcrumbs, they're not made with the crust and they're must larger and airier. Using them gives fried food a much lighter and crunchier breading. You can find them in the Asian section of most supermarkets.
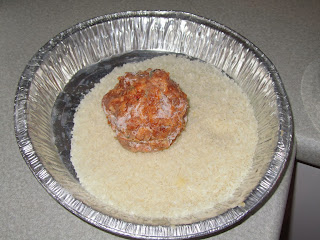
Now that you have your dishes lined up, it's time to make the breading. Coat your sausage molded egg in the flour, dip in the milk/egg mix, and roll in the panko.

Step 4: Cooking the Scotch eggs

Once that's done, you are ready to deep fry the eggs. Fry them in batches if needed, until golden, roughly 3 minutes. Flip them if necessary.
Place the fried eggs on a baking sheet and bake at 350°F for roughly 10 minutes. This extra step is to make sure that the sausage meat is fully cooked through.
After baking
Mix the mayonnaise with the mustard and lemon juice to make the dipping sauce.
Cut the eggs in half and serve with the dipping sauce. 
Normally, the yolk of the egg should be fully cooked. For reasons unknown, my eggs managed to go through boiling water, deep frying, and baking without the yolk fully cooking. I thought this was very strange, but being a fan of soft-boiled eggs this was not an issue.
Delicious despite runny egg yolk

Sunday, November 3, 2013

Soft Pretzels

Click me for a close up view of my yumminess!
When I first saw this recipe in the October edition of the Food Network magazine I just knew I had to try it. Even though it looked slightly challenging I felt it would be worth the effort. Boy was I right. These are absolutely addictive, like fresh bread out of the oven on steroids.

Surprisingly they were actually not that difficult to make. The most challenging part for me was shaping the thing to resemble a pretzel, which (maybe due to my lack of artistic skill) was completely puzzling for me, even with step by step pictures. Regardless, even if some were misshapen they still tasted like heaven.

For 12 pretzels
Ingredients

  • 3 tbsp unsalted butter, cubed and at room temperature
  • some melted butter for brushing
  • 2 tbsp packed brown sugar
  • 2 ¼ tsp of active dry yeast
  • 6 cups all-purpose flour
  • 2 tsp kosher salt plus more for sprinkling
  • 2/3 cup baking soda

Step 1: Activating your yeast


Mix together in the bowl of a stand mixer 2 cups of warm water (I heated cold water on high for 1 minute in the microwave) with the cubed butter and brown sugar. Sprinkle the yeast on top and let stand until foamy, about 10 minutes.
Before
After 10 minutes
If the yeast doesn't foam, it's either too old of you did something wrong. If it's the former, buy new yeast, if it's the latter, discard and start again.

Step 2: Starting the dough

Add 3 cups of the flour and 2 teaspoons of salt to the yeast mixture. Remember the rules when measuring flour. Do not dip your cup in the flour. Instead, pour the flour in your measuring cup until overflowing (without tapping) and use a knife to level it off. If you don't do this you risk putting in too much flour which in turn will make your dough too dry.
With the hook attachment, mix on low until the flour is incorporated and increase the speed to medium.
Dough after first 3 cups of flour
Add the rest of the flour at low speed once again. Increase the speed to medium. At this point your dough should gather into a ball and pull away from the sides. Let run for roughly 5 minutes
After 6 cups of flour, kneaded for 5 minutes
Brush a metal bowl with some melted butter and add the dough, coating it in the butter. Cover with a plastic wrap and let rise for an hour or until doubled in size.
Before

After 1 hour

Step 3: Forming the pretzels

Divide your dough into 12 pieces. Just cut it in half, and cut each half into 6 pieces. 


Measure out a 24 inch piece of string and place on your counter as a guidance. This will be the length you will need to roll out from you pieces of dough. With your hands, take a piece of the dough and roll out from the middle outwards until it reaches the length of the string.
Once at the right length, take the rope of dough and form into a U and twist 2 times in the middle. Fold the ends over and attach them to the bottom of the U.

It's a little rough, but you get the idea.
Place on an aluminum foil lined baking sheet (coated with cooking spray) and repeat with the rest of the dough pieces. You should have 3 baking sheets with 4 pretzels on each. Once completed, cover your sheets with plastic wrap and let the pretzels rise for 30 minutes.

Step 4: Boiling/Baking the pretzels

While the pretzels are rising, preheat your oven to 425°F and place one oven rack in the top third of the oven, and another in the bottom third. Bring 10 cups of water to a simmer with the baking soda, whisking it to dissolve it completely in the water.
Once your 30 minutes are up, carefully peel the pretzels away from the baking sheet and slip them into the simmering water. Simmer for 45 seconds and carefully flip them over to simmer for another 45 seconds. Use a slotted spoon to remove the pretzels and place them back on your baking sheet. Do this in batches of 3 or 4.
This step is actually the secret to making the pretzels. The baking soda creates a base environment that coats the pretzels. This alkalinity helps along the Maillard reaction, which is the browning of the dough. Simply put, the baking soda bath with help the pretzel brown up faster while baking, Therefore you won't need to bake it as long to have a crusty outside which allows the texture inside to remain soft, and wonderful.
After boiling, ready for the oven
Once all of the pretzels have been boiled, sprinkle them generously with salt and put them in the oven. Bake them for roughly 6 minutes and then rotate the pans in the oven. Bake them for another 6 minutes or until they are sufficiently brown on the outside.
Once out of the oven, brush the top with some melted butter. Wait a couple of minutes and enjoy. They are at their best fresh out of the oven. I dare you to eat just one.
Misshapen and delicious!